Sending a wrong email to someone by mistake and instantly regretting it must have happened to everyone at least once. In such a situation, Outlook’s recall email feature proves helpful.
Using this feature, you can not only unsend an email in Outlook but replace it with a new one. Furthermore, it can also be useful when you send an email without the attachment or upload the wrong file.
If you do not know how to recall an email in Outlook, you have come to the right place. In this article, you will find a step-by-step guide for using this feature on desktop and web apps, plus some alternate solutions available for Outlook users.
Key Takeaways:
- Recall Outlook email on the web and desktop program, then replace it with the correct version using the built-in feature.
- Unsending emails on Outlook has a few limitations that could cause the attempt to fail.
- Try delaying or scheduling one or all the outgoing messages as an alternative to retracting emails.
How to Recall Email in Outlook Web, Windows, and Mac
Outlook has two different app versions for Windows and Mac users. You can access it on the web or use the dedicated apps for each platform.
Moreover, you should know that the email recalling feature is only available on desktop applications. Outlook’s Android and iPhone app users must access it on the browser or PC.
Check out the guide below to recall a message in Outlook Web, Windows, Macbook, Android, and iPhone.
Method 1) How to Retract an Email in Outlook Website
Microsoft, the parent company of Outlook, often introduces new features to the program. Recently, it launched a free Outlook app for Windows with a new look similar to its web version.
Outlook app users must enable the undo send feature to avoid unintentional messaging. If you are using either the web or free Windows app, follow the instructions for email retraction:
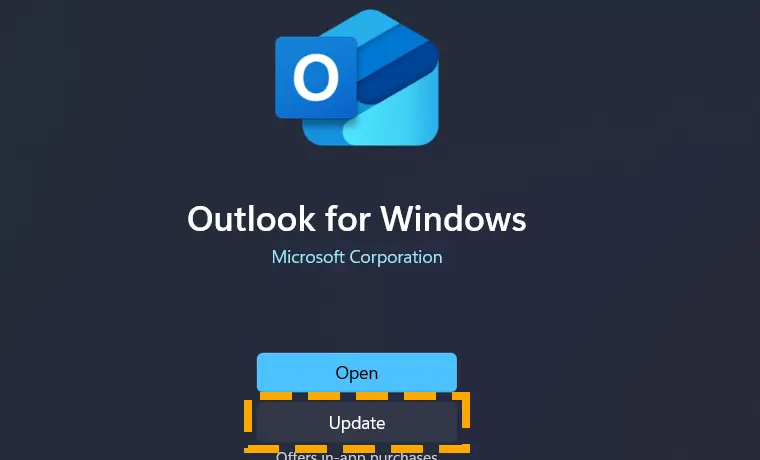
Step 1) Get a new Outlook from the Microsoft Store or open its web app. Log in with your own email.
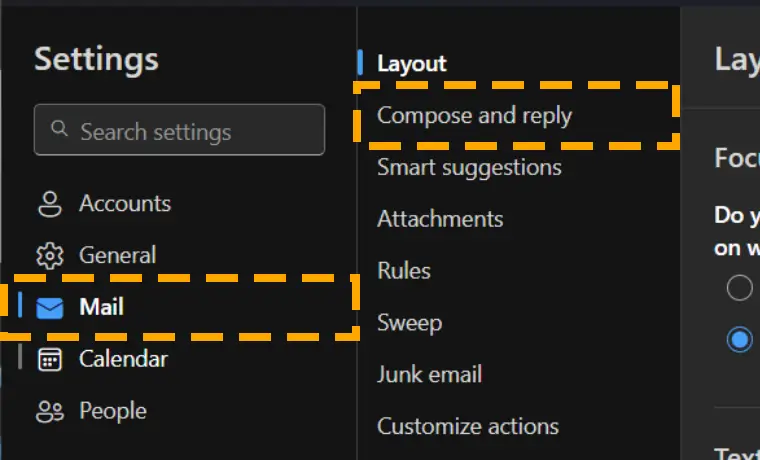
Step 2) Locate and hit the gear icon for the settings.
Step 3) Navigate to Mail, then Compose & reply tab.
Step 4) Scroll down and, under Undo Send, move the slider to the left to set the duration for the email retraction option to remain available.
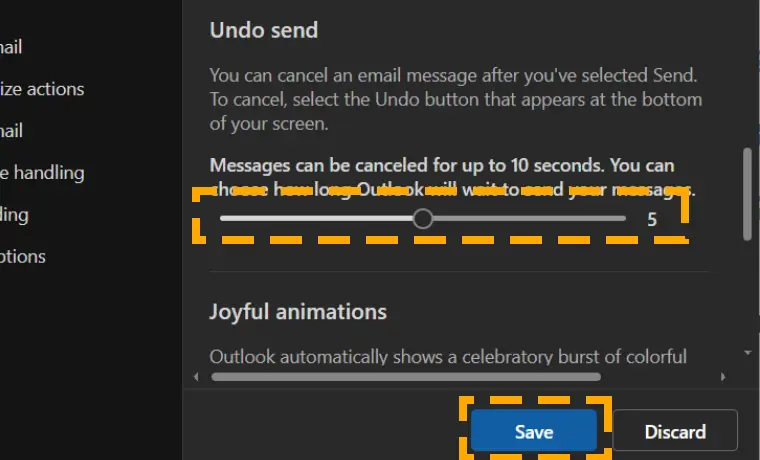
Note: For your own convenience, set the Undo Send time to the max. Then, whenever you hit send in the future, you will have 10 seconds to cancel.
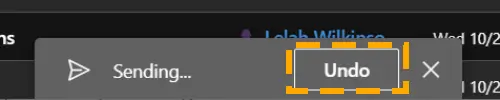
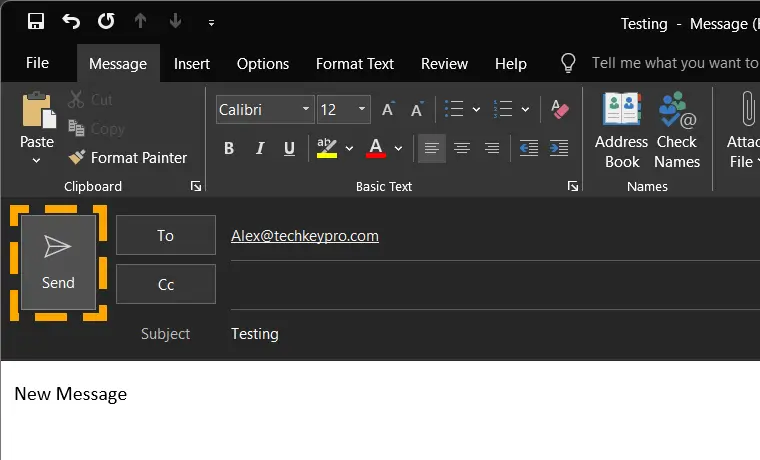
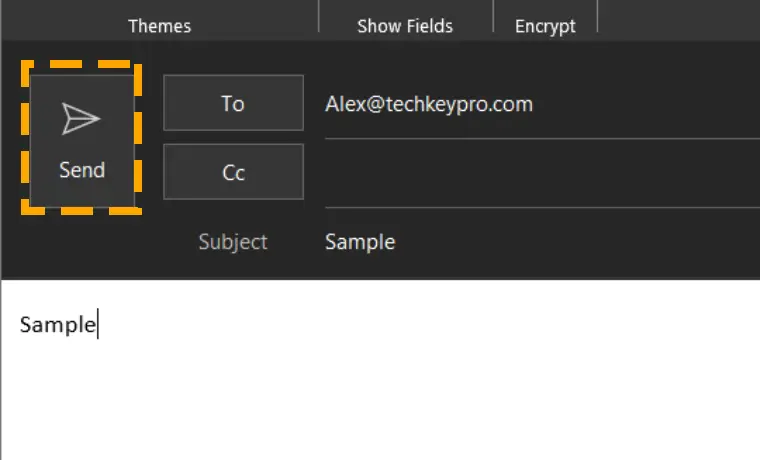
Step 5) Create a new email, type the message, and hit send.
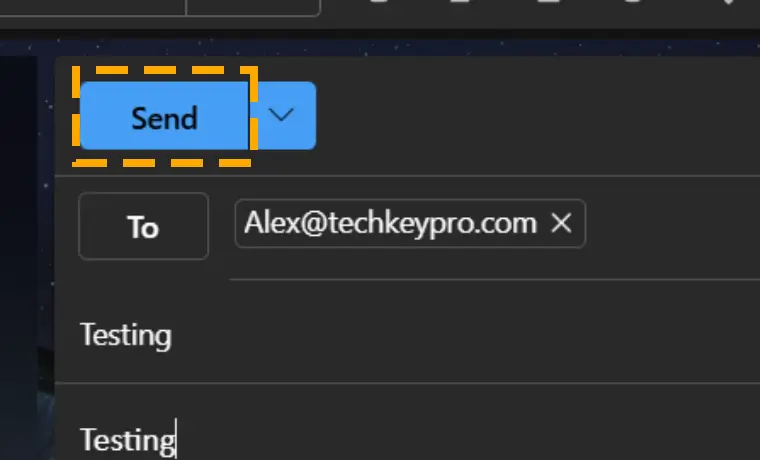
Step 6) Recall the email by hitting the Undo within 10 seconds.
Method 2) How Do I Recall an Email in Outlook For Desktop
Owners of Windows and MacOS running PCs can easily download the Microsoft 365 package to enjoy many useful programs, including Outlook. The email and information manager allows you to recall a message sent without letting the recipient know.
As the main purpose of this feature is to prevent the recipient from reading the message, it only works for emails that have not yet been read.
However, even if a lot of time has passed, you should give it a try to safeguard yourself from the embarrassment of sending the wrong email.
Follow the steps recall email on Outlook 365 for Windows & Mac:
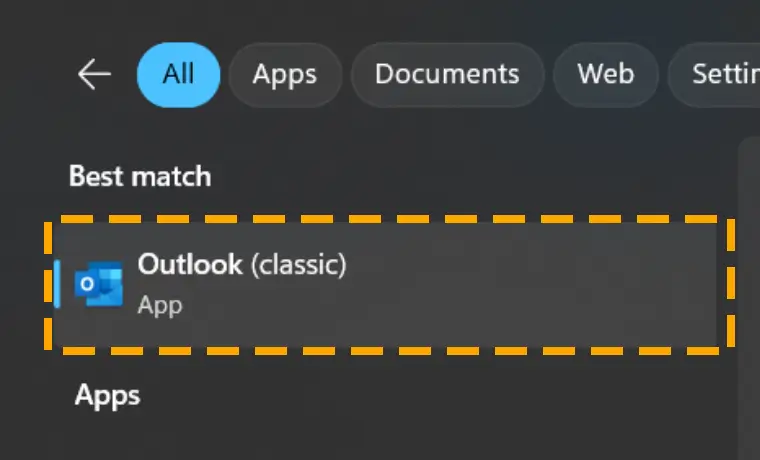
Step 1) Run the Outlook (classic) program on your desktop and sign in.
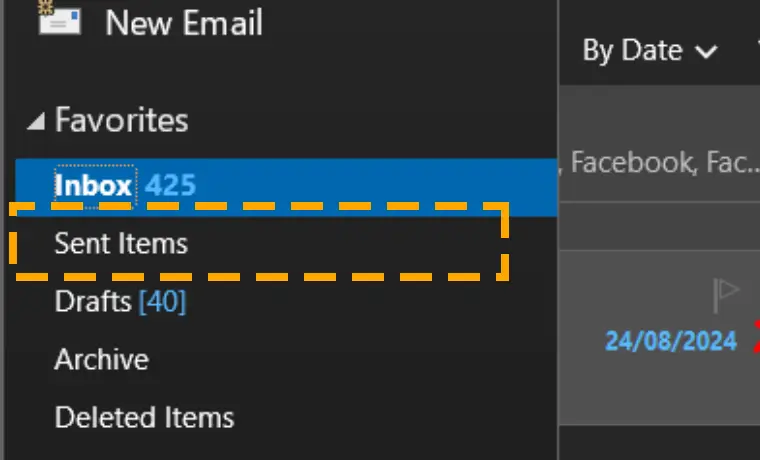
Step 2) On the left side of the Outlook home page, locate and click the Sent Items folder.
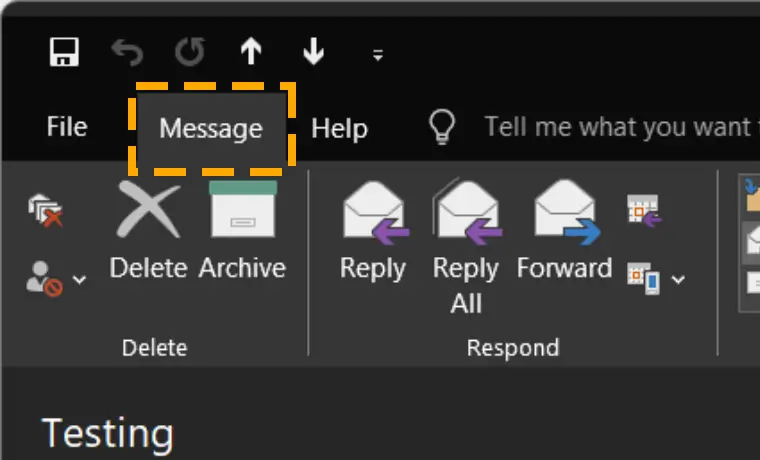
Step 3) Double-click the email you wish to unsend. Then, navigate to Message from the menu bar or ribbon at the top.
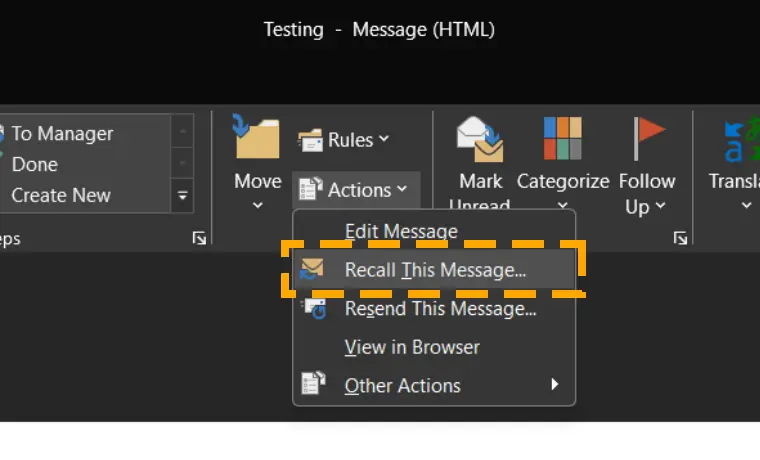
Step 4) In the Move section, click the Actions icon and select ‘Recall This Message’.
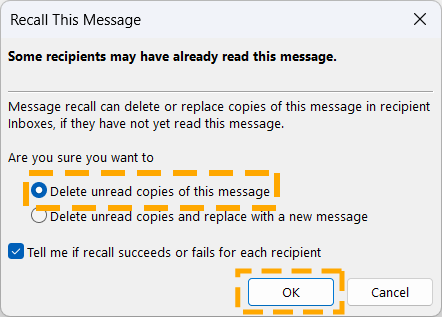
Step 5) Check the appropriate action and hit OK.
Method 3) How to Replace an Email in Outlook
Outlook’s recalling email feature does not stop at just deleting the sent email. You can also replace it with a message that has no issues.
This option is handy when correcting a mistake, adding new information, or attaching the right file. On the other hand, recalling is enough if you just sent the email to the wrong person.
Follow the steps to replace an Outlook Email:
Step 1) Head to the Sent Items folder on your Outlook 365 and double-click the email you want to replace.
Step 2) Click the Action option at the top and select Recall this Message.
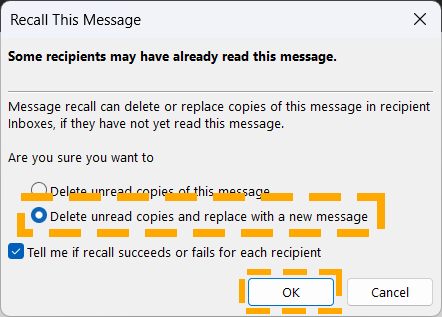
Step 3) Select Delete unread copies and replace with a new message and click OK.
Step 4) Edit the message and hit Send.
Depending on the number of recipients, Outlook will soon complete the process of recalling old emails and replace them with new ones.
What Happens When You Recall Outlook Email
After hitting the recall option, you should determine whether the attempt was successful. Here are a few things you can look for to learn the outcome:
Successful Email Recall
If email recalling succeeds, Outlook will notify you within 30 seconds. You will get a confirmation report via email. Click on the link in the email to open the report in your default Outlook browser.
Failed Email Recall
Outlook also sends you a report in case of a failure to retract an email. You will only find the “cannot be recalled” message under your original message in that report.
Prerequisites & Limitations of Outlook Recall this Message Feature
Every digital software feature comes with some limitations. Similarly, Outlook’s recall message has a few drawbacks and requires you to check a few things before using it. Here are essential requirements and constraints of Outlook unsend email that you need to know to benefit the most:
- Microsoft 365 or Exchange Only: To use the feature, both the sender and the recipient need to have Microsoft 365. If either party employs a different email service, an attempt to retract may notify the recipient.
- No Protection: You can only recall an email sent in Outlook that Azure Information Protection does not protect.
- POP3 or MAPI Accounts Not Supported: Outlook enables you to manage your Gmail, Yahoo, and iCloud accounts on its application. However, you cannot unsend messages with POP3 or MAPI email accounts.
- Unread Messages: For Outlook’s recalling messages option to succeed, the target email should not have been read yet.
Why You Cannot Unsend an Email in Outlook?
Once you know the requirements and limitations of the Outlook unsend feature, check out the causes that may result in its failure:
- Different Email Service: You may fail to recall an email on Outlook due to a different email client on the recipient end.
- No Outlook 365 on Both Ends: As mentioned in the prerequisite, this feature requires both the sender and recipient to be on Outlook 365.
- Internet Connectivity: Call back an email in Outlook does not work without an active internet connection.
- Email Already Opened: In Outlook, you may fail to take back an email if the recipient has already read the message.
- Shared Inbox: Messages sent to an address with the inbox shared with more than one person may fail to get deleted.
- Message Redirected: Rules set by the account owner may have redirected the email to another folder, making it impossible to recall.
Alternate Solution: Delay Emails on Outlook
Delaying email is an alternative to Outlook recalling a message solution. You can rely on this feature when you cannot recall or choose not to. It is easy to use and does not involve any risk-taking.
Employing this feature is a preventive measure that gives you time to review your message even after hitting send. During that period, if you find any error, you can choose to undo it. Below, you will find steps to enable delay for a single email and set the rule for every email you send.
Schedule an Outgoing message in Outlook:
Step 1) Go to the Options tab while composing an email in Outlook.
Step 2) Locate and Click on Delay Delivery.

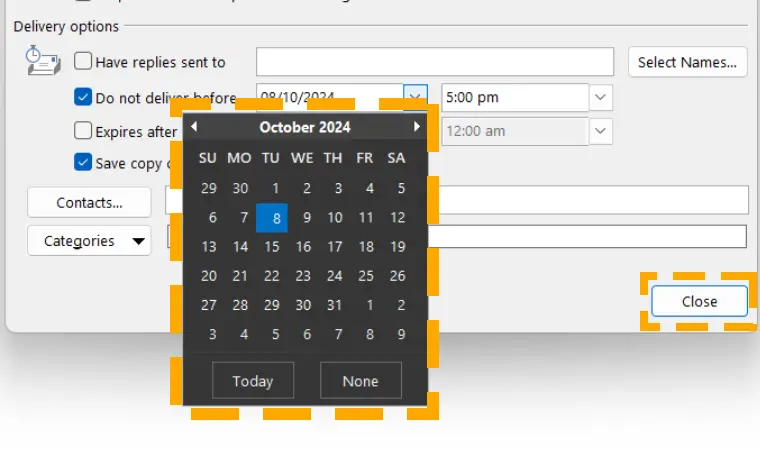
Step 3) Hit on the checkbox for the Do not deliver before option.
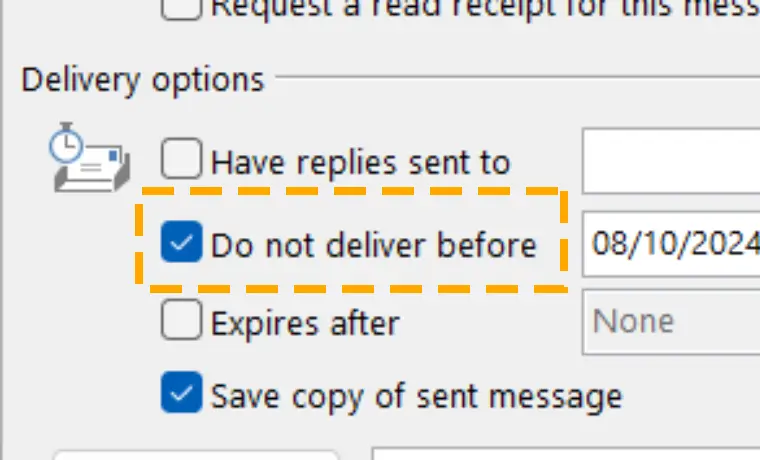
Step 4) Select the date and time. Then, Close the dialog box.
Step 5) Input all the details in the email and hit Send.
Delay all outgoing messages in Outlook:
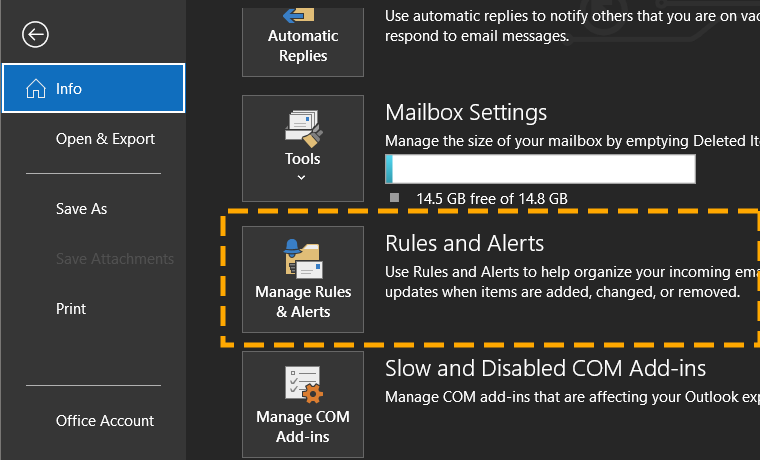
Step 1) Open Outlook 365 and navigate to File > Manage Rules & Alerts.
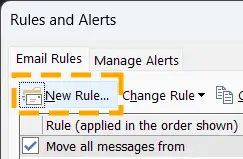
Step 2) Under Email Rules, Select New Rule.
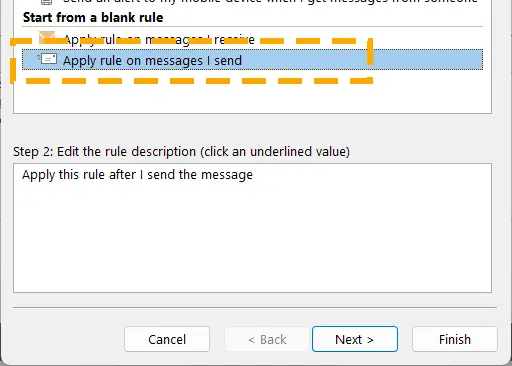
Step 3) On the Rules Wizard windows, Select “Apply rule on messages I send” in the Step 1 box. Then hit Next.
Step 4) Select one or more conditions, then move to the next page.
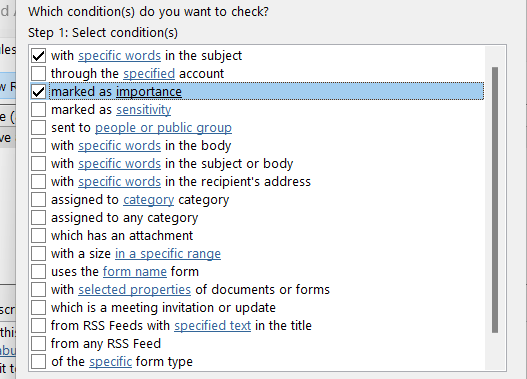
Note: You can leave all the options unchecked to apply the rule to every email you send. Outlook will also notify you and ask you to confirm the action.
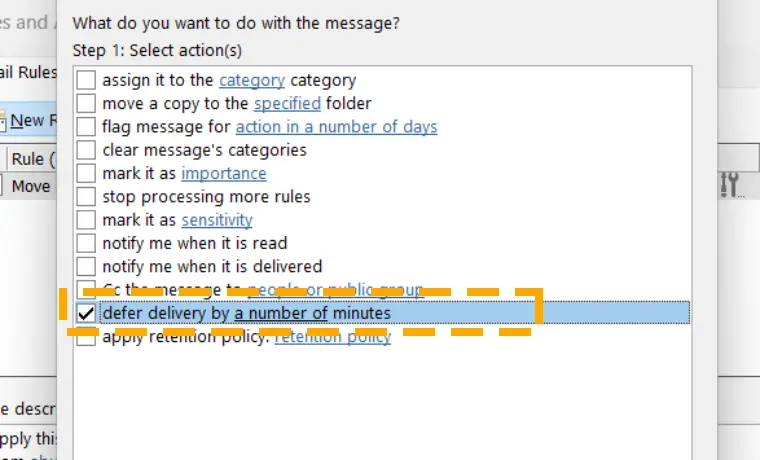
Step 5) Choose “defer delivery by a number of minutes” as an action.
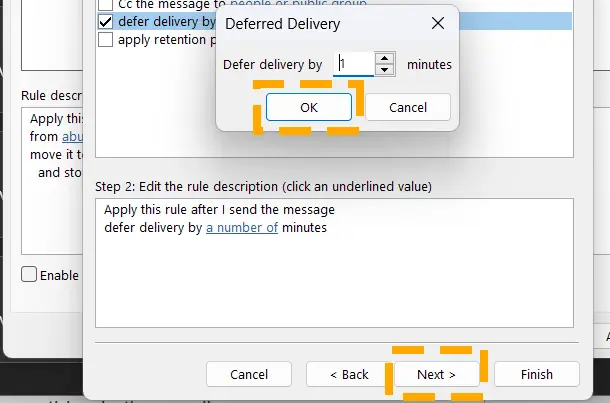
Step 6) Click on “a number of” text link in the Step 2 section. Enter the minutes you wish to delay the delivery of your emails. Then click OK and Next to save.
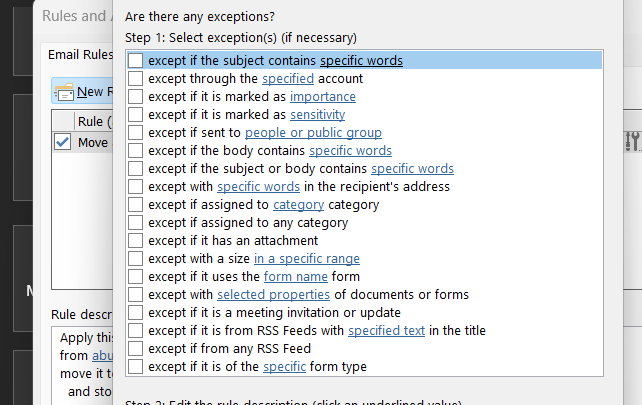
Step 7) Mark exceptions or leave all unchecked to set the rule for all.
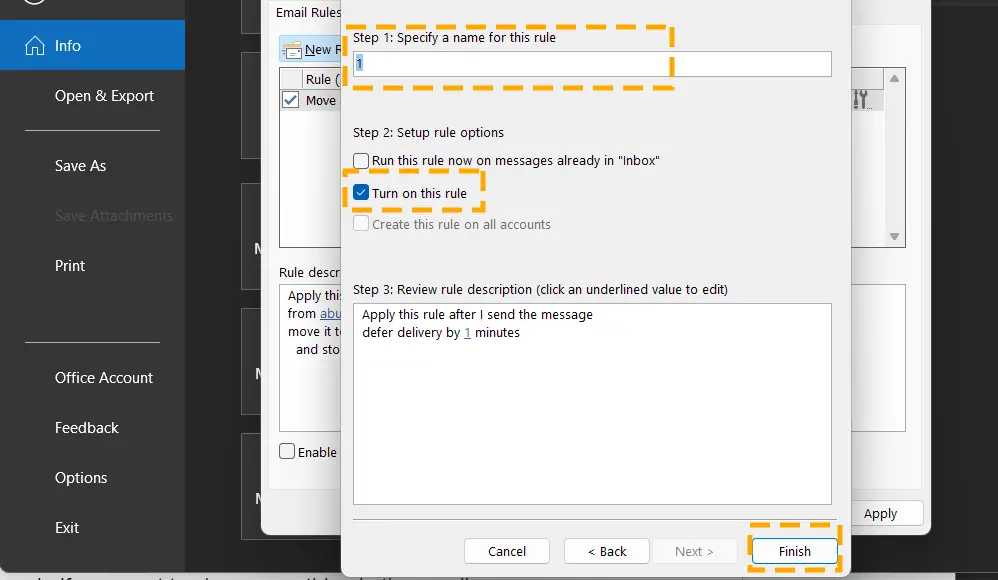
Step 8) On the last page, give the appropriate name to the rule in Step 1, check “Turn on this rule” in Step 2, and hit Finish.
From now on, all the messages you send from Outlook will take a set number of minutes to get delivered. While it waits in the Sent Items folder, you can cancel, edit, and send it again if you want to change anything in the message.
Conclusion
Once you learn how to recall an email in Outlook from this article, you can improve your business communication by making it more effective and maintaining professional standards.
However, complete reliance on the recall feature may not be the right approach. To avoid any blunder, you should take some preemptive measures, like enabling the Undo Send, Schedule, Delay, or add a template for auto reply. Check out the dedicated resource page for more in-depth guides and tips on becoming an Outlook expert.